Auto-incrementing ID Columns in Google Sheets
You too can have your very own magic ID column!
One fun aspect of answering Cloudstitch support tickets is seeing what kinds of crazy cool spreadsheet-powered web apps people are dreaming up. And these support tickets often drive what new features we cook up. A few weeks ago I wrote about adding Rails-style joins to our spreadsheet data API. This post is about a related topic: auto-incrementing ID columns.
Auto-incrementing IDs are the bread and butter of database tables. They’re a way to guarantee that every single item in your database (or spreadsheet, in our case) has a unique label that can be used to join data or refer to it elsewhere (like in your web UI code). The problem is there’s no clean and easy way (at least to our knowledge) to magically create such a column using just cell formulas.
The good news is both Google Spreadsheets and Excel let you attach little computer scripts to your spreadsheets to do things to the data that mere spreadsheet formulas trip over. So here is a quick tutorial for adding auto-inc columns in GSheets.
Step 1. Add a Google App Script script to your Spreadsheet
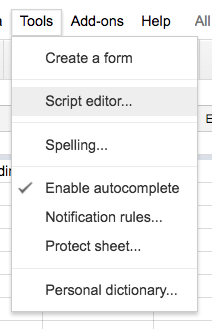 Adding a script to your spreadsheet
Click on the **Tools **menu and then on Script Editor. That will take you to a little-seen code editor connected to your spreadsheet data that is about to become your best friend…
Step 2: Copy and paste this script in there
This script that loops over your spreadsheet and adds an incrementing number to each row in the portion of your spreadsheet that contains data. (The last thing you want is your spreadsheet suddenly getting numbers filling up all the blank rows up to 999,999,999)
You might need to change which column (**AUTOINC_COLUMN, **zero indexed) you want your ID in and how many header rows (HEADER_ROW_COUNT) your sheet has (so the script doesn’t write over them. Also, if your worksheet is named something other than Sheet1, change it inline 7.
Code snipped to create auto-incrementing id columns in Google Spreadsheets
Step 3: Run and Approve the Script
Copied? Pasted? Good.
Now click the little play button on the toolbar to force the script to run for the first time. What we’re really trying to do here is trigger Google’s authorization request. Even though you created this script from inside your spreadsheet, Google want’s to double-check that it’s allowed to see your data.
Authorizing your Google Apps Script to run
Step 4: Schedule the script to run whenever the sheet changes
And here’s the final, very important step: you need to tell Google to re-execute this script whenever anything changes. This means if you’re using the Cloudstitch API to post data to your spreadsheet, new rows will automatically get a new ID number.
Click on the clock icon on the toolbar to open the scheduling dialog box, and create a new schedule item for “On change” events to your spreadsheet.
That’s it!
Hope this helps!
We love to give high fives. Please send all the cool spreadsheet-based web apps you build to @cloudstitch on Twitter.